
A customizable cross-platform launcher. This was adapted from CEN64-Qt to work with Mupen64Plus.
A discussion thread can be found here.
- Getting Mupen64Plus-Qt
- First Launch and Setup
- ROM Collection
- Game Information from TheGamesDB
- Editor For mupen64plus.cfg
- Mupen64Plus Log Viewer
- Configuration File
- Comparison to Console UI
- Linux: GLideN64 Workaround
Stable releases for Linux, Windows and OSX can be found on the releases page.
Note the Linux release is just a tar.gz archive containing an executable. It's a 64-bit executable that is linked to Qt5, so you'll need Qt5 installed to run it. If you have issues with it, see the section below on building.
Debian/Ubuntu: Mupen64Plus-Qt is in the repositories: apt-get install mupen64plus-qt. Alternately, see the section below on creating a .deb package.
Arch Linux: https://aur.archlinux.org/packages/mupen64plus-qt/
Redhat/Fedora: See the section below on creating a .rpm package.
FreeBSD: Mupen64Plus-Qt is in the ports tree: cd /usr/ports/emulators/mupen64plus-qt && make install clean.
Automatic builds of the latest git commit can be downloaded here:
Linux: mupen64plus-qt_linux_git-latest.tar.gz
Windows: mupen64plus-qt_win_git-latest.zip
OSX: mupen64plus-qt_osx_git-latest.dmg
Be aware that these may contain bugs not present in the stable releases.
First, obtain the source code for Mupen64Plus-Qt. You can either clone the repository with git or download an archive of the source code for a specific release from the releases page.
You'll need to make sure you have qmake, g++, the Qt development libraries and the QuaZIP development files installed. On Debian/Ubuntu, this can be accomplished by:
# apt-get install qt5-qmake g++ qtbase5-dev libquazip5-dev libqt5sql5-sqlite
You may need to replace libquazip5-dev with libquazip-qt5-dev depending on your OS version.
Once the needed packages are installed, create the Makefile with qmake and then build with make. Run the following commands from the directory that contains mupen64plus-qt.pro:
$ qmake
$ make
If qmake returns "qmake: could not find a Qt installation of ''", you can try running QT_SELECT=qt5 qmake or /usr/lib/x86_64-linux-gnu/qt5/bin/qmake. Some distributions also contain a qmake-qt5 symlink.
You also have the option to compile QuaZIP statically. Download the QuaZIP sources from Sourceforge. Place the contents of quazip-<version>/quazip/ in quazip5/ within the project directory. Then run:
$ qmake CONFIG+=linux_quazip_static
$ make
You will see warnings after the qmake step if the QuaZIP sources are in the wrong place.
You can build and install a debian package using the files found in dist/debian:
$ sudo apt-get install build-essential devscripts debhelper qt5-qmake qtbase5-dev libquazip5-dev libqt5sql5-sqlite
$ ./dist/debian/deb-build.sh
$ sudo dpkg -i mupen64plus-qt_<VERSION>-1.<ARCH>.deb
You may need to replace libquazip5-dev with libquazip-qt5-dev depending on your OS version.
You can build and install an RPM package using the spec file found in dist/redhat:
$ sudo dnf install rpmdevtools qt5-qtbase-devel quazip-qt5-devel zlib-devel gcc-c++
$ ./dist/redhat/rpm-build.sh
$ sudo rpm -i ~/rpmbuild/RPMS/<ARCH>/mupen64plus-qt-rpm-<VERSION>.<ARCH>.rpm
Note the resulting package is named mupen64plus-qt-rpm to avoid conflicts with some third-party mupen64plus RPMs.
Mupen64Plus-Qt contains code that attempts to auto-detect a Mupen64Plus installation. These settings are located at Settings->Configure->Paths. See below for a per-OS description of this and what to do if Mupen64Plus is not auto-detected.
Mupen64Plus-Qt looks within common locations distributions place the mupen64plus binary, plugin libraries and data files. If any of these aren't found, obtain the Mupen64Plus package for you distribution and peek inside to see where the files are placed (or use a utility such as find or mlocate).
The plugin directory should contain mupen64plus-video-rice.so, mupen64plus-video-glide64mk2.so, etc. The data directory should contain mupen64plus.ini. You should be able to find the executable by running which mupen64plus.
It's best to place mupen64plus-qt.exe within the same folder as mupen64plus-ui-console.exe (mupen64plus.exe before version 2.5) as Mupen64Plus-Qt looks in the same directory it's running from to try and find the executable, plugins and data files.
If you place it somewhere else, set the plugin directory and data directory to the same folder containing mupen64plus-ui-console.exe.
Mupen64Plus-Qt looks for mupen64plus.app within the same directory where Mupen64Plus-Qt.app is placed.
If you place it somewhere else, simply select mupen64plus.app as the executable and it will autofill the plugin and data directory settings for you (these are within mupen64plus.app).
You can specify ROM directories under Settings->Configure->Paths. Mupen64Plus-Qt will search for any .z64, .v64 or .n64 files within these directories and also check within .zip files and subdirectories (one level deep). After adding or removing directories to this list, it will automatically refresh your ROM list. You can manually refresh your list with File->Refresh List.
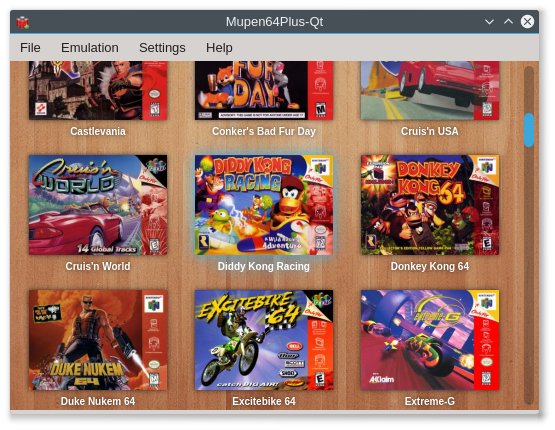
Mupen64Plus-Qt contains three options for displaying your ROMs: a table view, grid view and list view. The view can be changed under Settings->Layout. These can be configured under Settings->Configure.
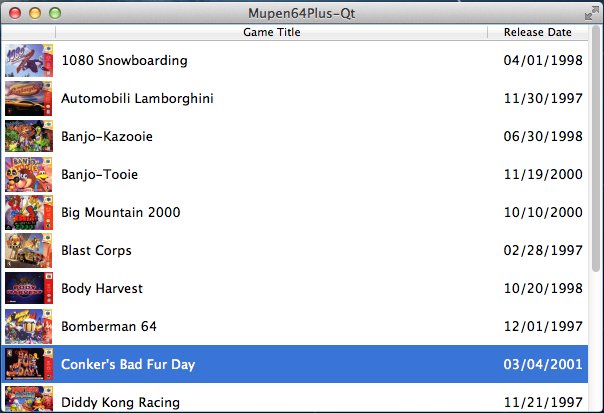
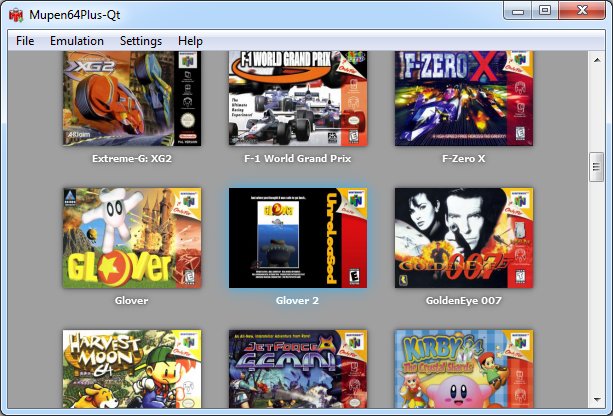
In each of the views, you can simply double click a game to launch it, or single click to select it and use Emulation->Start.
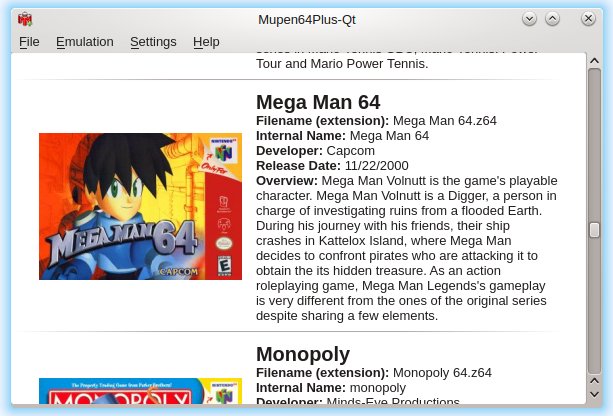
Mupen64Plus-Qt supports downloading game information and cover images from thegamesdb.net. This can be enabled under Settings->Configure->Other. It's recommended you have the data directory set (under Paths) before using this. Once enabled, you'll need to refresh your ROMs list to download the information. Afterwards, images and other information about the game can be added to the views.
Note: TheGamesDB shut off version one of their API which is used in Mupen64Plus-Qt 1.11 and below. You will need version 1.12 to download game information.
If a game is not found or is incorrect, Mupen64Plus-Qt supports refreshing information for a single ROM. Just select the ROM and go to File->Download/Update Info. From here you can enter a different search or the specific ID of the game (from the URL of the game on thegamesdb.net).
You can delete the game information fetched from TheGamesDB by using File->Delete Current Info. Note that if you are deleting a game's information because the game doesn't exist on TheGamesDB and Mupen64Plus-Qt pulled the information for different game, it's better to create an account on TheGamesDB and add the game so other users can benefit as well.
This will cause Mupen64Plus-Qt to not update the information for this game until you force it with File->Download/Update Info
If desired, you can also manually update the information from TheGamesDB. Note that if any information is incorrect, it's best to create an account on TheGamesDB and fix it there so all users can benefit.
The information cache can be found here:
Linux: /home/<user>/.local/share/mupen64plus-qt/cache_v2/<MD5 of game>/
Windows: cache_v2 folder in same directory as executable -> MD5 of game
OSX: /Users/<user>/Library/Application Support/mupen64plus-qt/cache_v2/<MD5 of game>/
You can find the MD5 of a game by using the table or list view and adding "MD5" to the current information.
Edit data.json with a text editor and replace any information you want to change. You can also replace boxart-front.{jpg,png} with an image of your choosing.
If you are getting timeout messages due to an issue with slow responses from TheGamesDB API, you can extend the timeout by editing the configuration file and adding networktimeout under [Other]:
[Other]
...
networktimeout=30
This example shows 30 seconds. The default is 10 seconds.
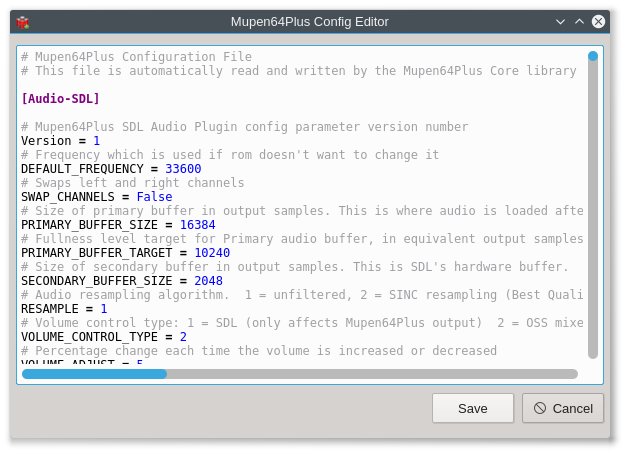
Mupen64Plus-Qt contains an editor with syntax highlighting for mupen64plus.cfg. To use it, make sure you have your config directory set under Settings->Configure->Paths. Mupen64Plus-Qt should auto-detect this setting for you. If it doesn't, the default location is:
Linux: /home/<user>/.config/mupen64plus/
Windows: C:/Users/<user>/AppData/Roaming/Mupen64Plus/
OSX: /Users/<user>/.config/mupen64plus/
Mupen64Plus-Qt allows you to view the output from the Mupen64Plus console UI. Select Emulation->View Log after Mupen64Plus has quit to see the output from the last run.
Mupen64Plus-Qt saves its settings to a text file. If for some reason you would like to modify this, it's contained at the following locations:
Linux: /home/<user>/.config/mupen64plus/mupen64plus-qt.conf
Windows: mupen64plus-qt.ini within the same directory as the executable
OSX: /Users/<user>/Library/Preferences/com.mupen64plus.mupen64plus-qt.plist
Mupen64Plus-Qt utilizes the console UI to launch games. It contains support for most of the command line parameters. These can be viewed by running Mupen64Plus from a terminal with the --help parameter or here.
See below for how each parameter is used within Mupen64Plus-Qt:
One or the other is sent to Mupen64Plus based on whether the "On Screen Display" checkbox is checked under the graphics tab.
Similarly, one or the other is sent based on the "Fullscreen" checkbox underneath the graphics tab.
This can be configured with the "Resolution" combo box underneath the graphics tab. The list is generated based on common resolutions smaller than your current desktop resolution. If you require a resolution not in the list, just set the "default" option which will not send the --resolution parameter to Mupen64Plus (Mupen64Plus will read from whatever setting is within its configuration file in this case).
This is configured under the paths tab. It's entirely optional, but allows you to specify a different directory to load the mupen64plus.cfg file from (useful if you want to say, load different input settings at different times).
You can also specify the config directory on a per-game basis under Settings->Configure Game.
This is set underneath the paths tab. Mupen64Plus-Qt will also make use of the data directory setting to load the GoodName text and other information from the mupen64plus.ini file, so make sure this directory contains that file. It's usually /usr/share/mupen64plus on Linux or the same directory as the executable on Windows.
The plugin directory is usually /usr/lib/mupen64plus or within the same directory as the executable on Windows. Mupen64Plus-Qt also makes use of this directory setting to populate the options on the plugins tab (you must click Ok first before they will populate).
These are configured under the plugins tab once the plugin directory has been set. You can also configure plugins on a per-game basis under Settings->Configure Game.
This is configured under the emulation tab.
One or the other is sent to Mupen64Plus based on the "Save Options" checkbox underneath the other tab. If --saveoptions is set, then Mupen64Plus will save whatever settings are passed to it into its configuration file (mupen64plus.cfg)
Mupen64Plus-Qt also supports specifying additional parameters both globally under Settings->Configure->Other->Additional Parameters and on a per-game basis under Settings->Configure Game->Other Parameters. You can specify any other parameters that the console UI supports here.
The main use of this is specifying cheats. For example, filling this with --cheats 'list' will allow you to double click on a ROM and then view the log for a list of cheats for that game (remove it to be able to launch the game again). You can then specify what cheats you want with --cheats 1,2-1,3, etc.
Be aware that if this contains anything that Mupen64Plus doesn't support, the emulator will not be able to launch.
Mupen64Plus-Qt contains support for this workaround for GLideN64 on Linux. There is no graphical option for this as it's more of a hack and should be fixed on GLideN64's end. Edit your configuration file at ~/.config/mupen64plus/mupen64plus-qt.conf and add "forcegl33=true" under [Other].